Hey hello visitors, how are you I hope you are going great. Do you know timely updating your blog and informing your visitors about the changes that is done is very effective and efficient thing to do.
Right so today we going to see How to Add Notification Widget in Median Ui 1.6 Header.

There are 5 steps involved in this. So please hold your time read the article 2 times before doing all the steps.
Before doing anything as always do Backup your blog template for any kind of error and easy restoration.
Adding Notification Widget in Median Ui v1.6
Below are given 5 steps follow it one by one.
Step 1
Adding CSS
- Go to your Blogger dashboard.
- Now go to Theme section and click on edit html.
- Now search for the code
/*]]>*/</style>closing tag. - Now copy the below given CSS and paste it just above the
/*]]>*/</style>code.
/* --- CSS Popup Notification --- */
#totalNotif_top{position:absolute;top:-9px;left:9px;font-size:8px;font-weight:900;color:white;background:rgb(242 22 22);padding:3px 4px;border-radius:30px;animation:text-flicker 4s linear infinite}
label.popup-notif.tIc.bIc::before{content: attr(data-text);font-size: 11px;line-height: 18px;padding: 0 5px;border-radius: 10px;background: #e6e6e6;color: var(--bodyC);position: absolute;top: -5px;right: -2px;z-index: 2;}
header .navicon .popup-notif{margin-left:12px;position:relative}
.wcIconNotif{position:relative;width:35px;height:35px;display:flex;left:-10px}
.wcIconNotif path{fill:#444}
.wcIconNotif:before{content:attr(aria-label);position:relative;display:flex;*padding:5px;font-size:8px;width:15px;height:15px;background-color:#e40101;color:#fefefe;justify-content:center;align-items:center;border-radius:50%;position:relative;top:-10px;left:26px;animation:flicker 4s linear infinite}
.followBLog{background:linear-gradient(135deg,rgb(32 167 246),rgb(115 190 243));color:#fff;font-size:20px;width:45px;height:45px;border-radius:50%;margin:auto;display:flex;justify-content:center;align-items:center;animation:codepro-noti 2s 0s ease-out infinite}
@keyframes codepro-noti{0%{box-shadow:0 0 0 0 rgba(74,177,255,0.5)}75%{box-shadow:0 0 0 16px rgba(148,209,255,0)}100%{box-shadow:0 0 0 0 rgba(148,209,255,0)}}
.wcNotif{position:fixed;opacity:0;visibility:hidden;z-index:999999;overflow-y:auto;top:0;right:20px;border:1px solid #ddd;height:auto;width:350px;max-height:calc(100% - 110px);display:block;border-radius:16px 5px 16px 16px;color:#48525c;box-shadow:10px 10px 35px rgba(0,0,0,0.1),-10px -10px 35px rgba(0,0,0,0.1);transition:all .3s ease}
.wcNotif li{border-bottom:1px solid #f1f2f4;padding:10px 10px 10px 0;display:block;align-items:center;margin:0 20px}
.wcNotifStart{background:var(--contentB);padding:20px 0!important}
.wcNotifStart ul{margin:0!important;padding:0;overflow:auto;box-sizing:border-box}
.wcNotifStart .more{margin:5px 0 0 -5px;font-size:12px}
#wcCheckPop:checked ~ .wcNotif{width:350px;visibility:visible;opacity:1;top:60px}
#wcCheckPop:checked ~ .wcNotif + .fullClose{visibility:visible;opacity:1}
#wcCheckPop,.wcPopMenu{display:none}
.wcPopMore{display:flex;align-items:center;font-weight:900;color:#262d3d;padding:0 5px}
.wcPopMore span{flex-grow:1}
.accorIcon{position:relative;flex-shrink:0;display:flex;align-items:center;justify-content:center;width:12px;height:12px;margin-right:15px}
.wcPopMenu:checked ~ .wcPopMore span{color:#00a8f8}
.wcPopMenu:checked ~ .wcPopMore .accorIcon:before,.wcPopMenu:checked ~ .wcPopMore .accorIcon:after{background-color:#f89000}
.wcPopMenu:checked ~ .wcPopMore .accorIcon:after{visibility:hidden;opacity:0}
.wcNotifStart .content{position:relative;margin-left:-30px;padding-left:32px;overflow:hidden;max-height:0;transition:all .2s ease;opacity:.8}
.wcPopMenu:checked ~ .content{max-height:100vh;padding-top:15px;padding-bottom:8px}
/* CSS darkmode */
.drK .wcNotif,.drK .wcPopMore{color:#fefefe;border:none}
.drK .wcNotif li,.drK .wcNotifStart{background:var(--darkBs);border-color:rgba(255,255,255,.1)}
.drK .wcNotifClose:before{color:#d3d3d3}
@media screen and (max-width:480px){#wcCheckPop:checked ~ .wcNotif{width:100%;top:0;backdrop-filter:blur(4px)}.wcNotifStart{border-radius:12px 12px 0 0;overflow:scroll}.wcNotif{min-height:100vh;width:100%;top:0;right:0;bottom:0;left:0}.wcNotifClose:before{content:'\10f057';font-family:'Font Awesome 5 Duotone';display:flex;position:relative;font-size:40px;color:#48525c;padding:10px 0;justify-content:center}}
/* CSS RTL mode */
.Rtl .wcNotif{left:20px;right:auto;border-radius:5px 16px 15px 16px}
/* shake effect rung */
.rung {
animation: code-pro-rung-lac 2s ease infinite;
}
@-webkit-keyframes code-pro-rung-lac {
0% {
-webkit-transform: rotate(0) scale(1) skew(1deg);
}
10% {
-webkit-transform: rotate(-25deg) scale(1) skew(1deg);
}
20% {
-webkit-transform: rotate(25deg) scale(1) skew(1deg);
}
30% {
-webkit-transform: rotate(-25deg) scale(1) skew(1deg);
}
40% {
-webkit-transform: rotate(25deg) scale(1) skew(1deg);
}
50% {
-webkit-transform: rotate(0) scale(1) skew(1deg);
}
100% {
-webkit-transform: rotate(0) scale(1) skew(1deg);
}
}Step 2
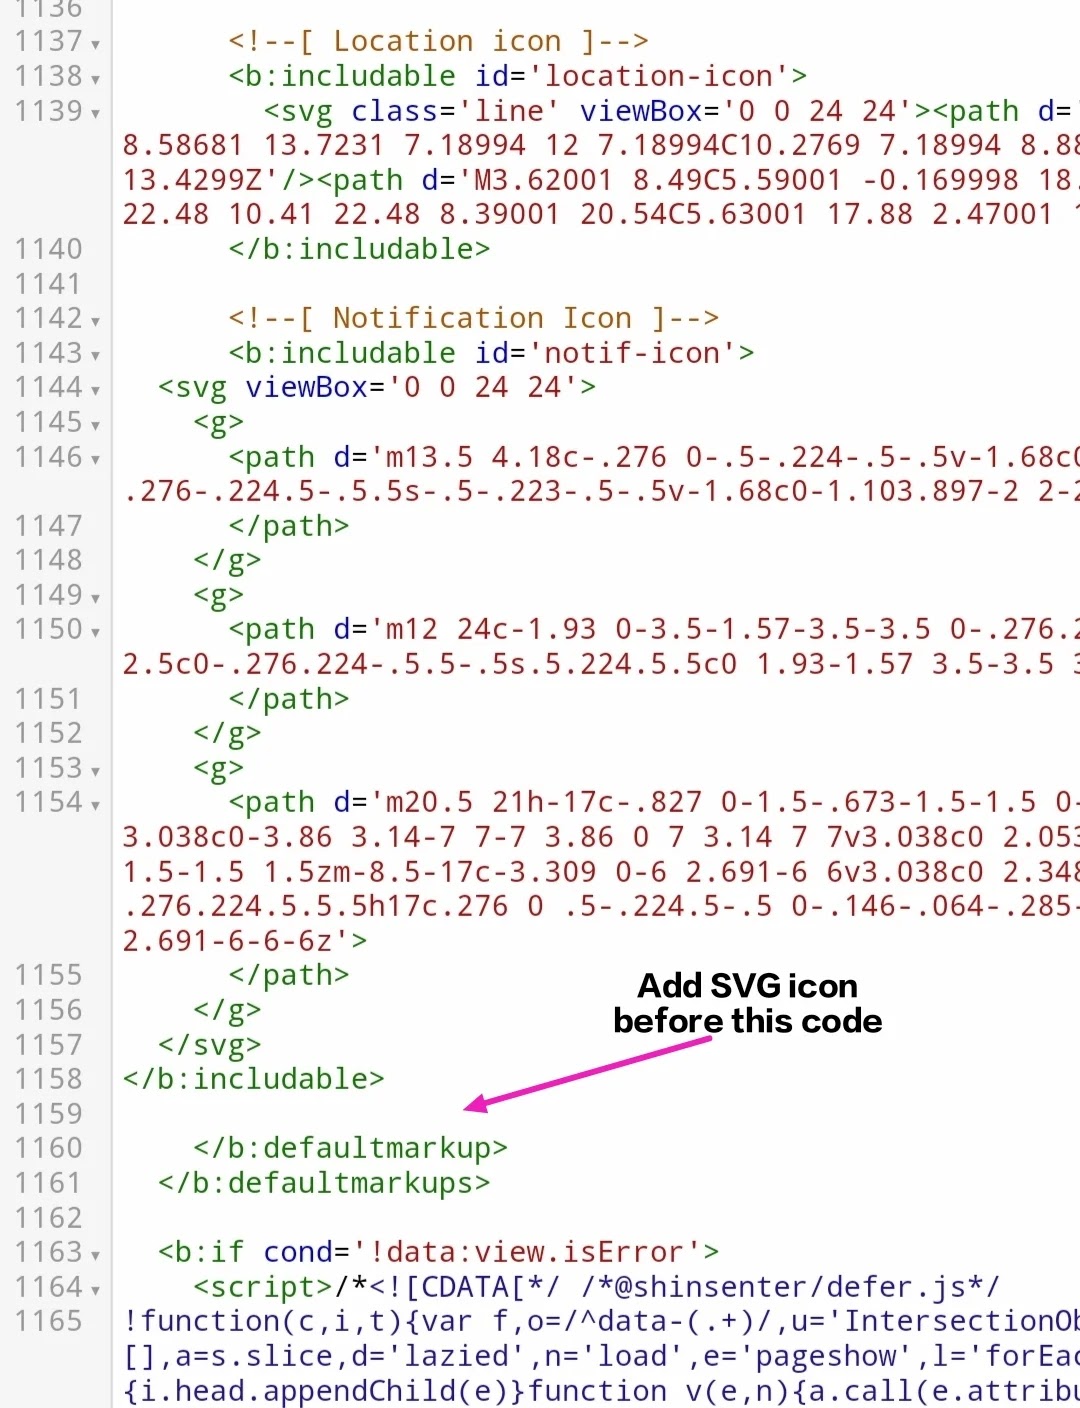
Adding SVG icon code
- Now search for the code
</b:defaultmarkup>in theme. - And copy the below given code and paste it just above the
</b:defaultmarkup>.
<!--[ Notification Button ]-->
<b:includable id='notif-icon'>
  <svg viewBox='0 0 24 24'>
    <g>
      <path d='m13.5 4.18c-.276 0-.5-.224-.5-.5v-1.68c0-.551-.449-1-1-1s-1 .449-1 1v1.68c0 .276-.224.5-.5.5s-.5-.223-.5-.5v-1.68c0-1.103.897-2 2-2s2 .897 2 2v1.68c0 .277-.224.5-.5.5z'>
      </path>
    </g>
    <g>
      <path d='m12 24c-1.93 0-3.5-1.57-3.5-3.5 0-.276.224-.5.5-.5s.5.224.5.5c0 1.378 1.122 2.5 2.5 2.5s2.5-1.122 2.5-2.5c0-.276.224-.5.5-.5s.5.224.5.5c0 1.93-1.57 3.5-3.5 3.5z'>
      </path>
    </g>
    <g>
      <path d='m20.5 21h-17c-.827 0-1.5-.673-1.5-1.5 0-.439.191-.854.525-1.14 1.576-1.332 2.475-3.27 2.475-5.322v-3.038c0-3.86 3.14-7 7-7 3.86 0 7 3.14 7 7v3.038c0 2.053.899 3.99 2.467 5.315.342.293.533.708.533 1.147 0 .827-.672 1.5-1.5 1.5zm-8.5-17c-3.309 0-6 2.691-6 6v3.038c0 2.348-1.028 4.563-2.821 6.079-.115.098-.179.237-.179.383 0 .276.224.5.5.5h17c.276 0 .5-.224.5-.5 0-.146-.064-.285-.175-.38-1.796-1.519-2.825-3.735-2.825-6.082v-3.038c0-3.309-2.691-6-6-6z'>
      </path>
    </g>
  </svg>
</b:includable>
Step 3
Adding HTML code.
- Now search for the code
<body>tag. - Look for this code
<b:attr name='id' value='mainCont'/>below<body>tag. - Copy the below given codes and paste it just below the
<b:attr name='id' value='mainCont'/>code .
<!-- [ PopUp Notification ] -->
  <input id='wcCheckPop' type='checkbox' />
  <div class='wcNotif'>
    <label class='wcNotifClose' for='wcCheckPop'>
    </label>
    <div class='wcNotifStart'>
      <ul>
        <!-- notification box -->
        <li style="border: 1px solid;display: flex;border-radius: 12px;flex-direction: row;margin-bottom:10px">
          <p style="width: 70%;text-align: center;">Click the bell button to receive notifications of the latest posts
          </p>
          <div class="followBLog" onclick='window.open("https://www.blogger.com/follow.g?blogID=blog-id")'>
            <i class="fad fa-bells rung"></i>
          </div>
        </li>
        <!-- noti 2 -->
        <li>
          <i><!--Day/month/year--></i> - <!-- Title -->
          <input class='wcPopMenu' id='pop-menu2' name='multi-popup' type='checkbox' />
          <label class='wcPopMore' for='pop-menu2'>
            <span class='more'>See more</span>
          </label>
          <div class='content'>
            <!-- More details here -->
          </div>
        </li>
        <!-- noti 1 -->
        <li>
          <i><!--Day/Month/Year--></i> - <!-- Title -->
          <input class='wcPopMenu' id='pop-menu1' name='multi-popup' type='checkbox' />
          <label class='wcPopMore' for='pop-menu1'>
            <span class='more'>See more</span>
          </label>
          <div class='content'>
            <!-- More details here -->
          </div>
        </li>
      </ul>
    </div>
  </div>
  <label class='fullClose' for='wcCheckPop'>
  </label>
  <script type='text/javascript'>
    //<![CDATA[
      document.addEventListener("DOMContentLoaded", () => {
        document.querySelector('.popup-notif').dataset.text = document.querySelector('.wcNotifStart > *').childElementCount
      });
    //]]>
  </script>
<!-- [ End Notification ] -->
Step 4
Changing widget settings.
- Find or search for the below given widget setting in theme.
- And copy the below given widget setting and replace it with the previous widget setting.
- Or you can only add this below code after the given line
<b:widget-setting name='sorting'>NONE</b:widget-setting>and change the number of shownum 3 to 4 in the widget settings .
<b:widget-settings>
<b:widget-setting name='shownum'>3</b:widget-setting>
<b:widget-setting name='sorting'>NONE</b:widget-setting>
<b:widget-setting name='item-2'>Profile</b:widget-setting>
<b:widget-setting name='item-1'>Search</b:widget-setting>
<b:widget-setting name='item-0'>Dark</b:widget-setting>
</b:widget-settings>
<b:widget-settings>
  <b:widget-setting name='shownum'>4</b:widget-setting>
  <b:widget-setting name='sorting'>NONE</b:widget-setting>
  <b:widget-setting name='item-3'>Notification</b:widget-setting>
  <b:widget-setting name='item-2'>Profile</b:widget-setting>
  <b:widget-setting name='item-1'>Search</b:widget-setting>
  <b:widget-setting name='item-0'>Dark</b:widget-setting>
</b:widget-settings>
<b:widget-setting name='item-3'>Notification</b:widget-setting>
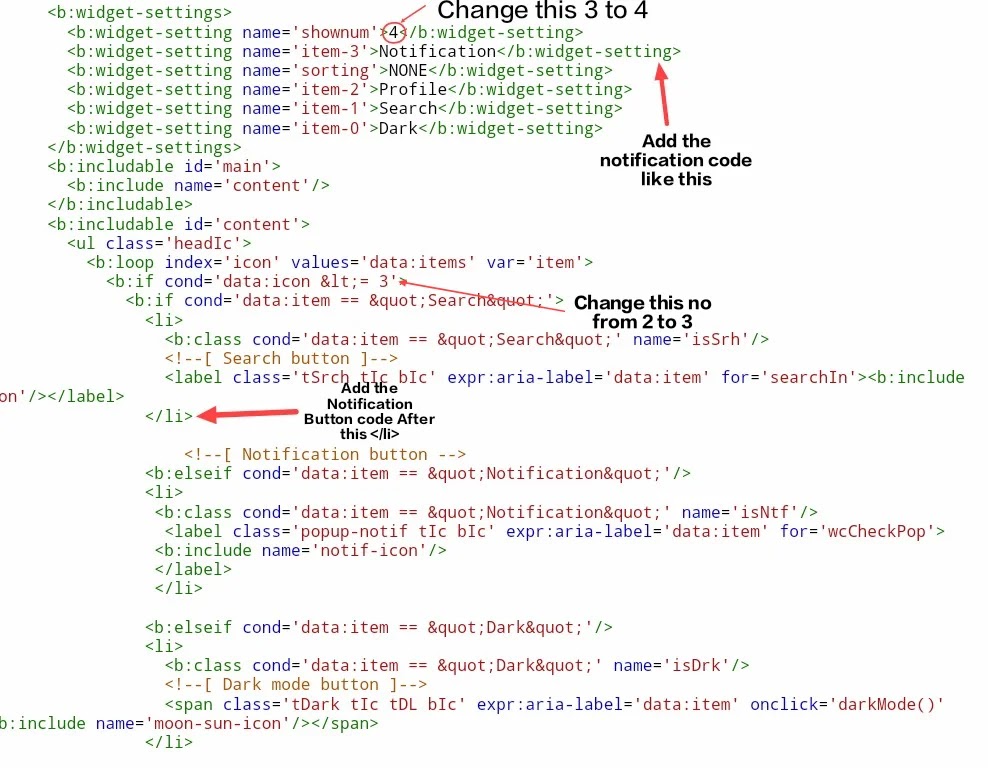
Step 5
Adding icon in head.
- Now search for this section
<b:section class='headP' id='header-icon' maxwidgets='2' showaddelement='false'>. - Scroll down to see this code in template
<ul class='headIc'>or search for the code . - You will find below this code
<b:if cond='data:icon <= 2'>change the number 2 to 3. - And copy the below code and paste it just after the first
</li>tag below there. Images are attached.
<b:elseif cond='data:item == "Notification"' />
<li>
<b:class cond='data:item == "Notification"' name='isNtf' />
<label expr:aria-label='data:item' class="popup-notif tIc bIc" for='wcCheckPop'>
<b:include name='notif-icon' />
</label>
</li>Step 6
Font Awesome Icon Js
Add this Font Awesome js if the icon is not working.<script type='text/javascript'>
//<![CDATA[
function loadCSS(e, t, n) {
"use strict";
var i = window.document.createElement("link");
var o = t || window.document.getElementsByTagName("script")[0];
i.rel = "stylesheet";
i.href = e; i.media = "only x";
o.parentNode.insertBefore(i, o);
setTimeout(function () { i.media = n || "all" })
}
loadCSS("https://pro.fontawesome.com/releases/v5.10.0/css/all.css");
loadCSS("https://cdnjs.cloudflare.com/ajax/libs/animate.css/3.5.2/animate.min.css");
loadCSS("ADD CSS STORED LINK");
loadCSS("ADD CSS STORED LINK");
//]]>
</script>So after following all the steps I hope you have successfully installed Notification Widget on Head of Median Ui 1.6 if you faced any problem kindly contact us.
Conclusion
So today in this article we have learnt How to Add Notification Widget in Median Ui 1.6 Header. I hope you find this article helpful. Do link and follow for more this types of articles. If you have any query kindly contact us.
Reference:
https://www.phamvanlinh.xyz


